There’s something undeniably magnetic about the idea of a traditional masonry fireplace in a barndominium. You’ve got this sprawling, open-concept space—often with soaring ceilings, steel beams, and concrete floors—and you want to anchor it with the warmth of crackling wood, the smell of smoke, and the timeless hearth that’s been the center of homes for centuries. But here’s the question that stops many barndo builders in their tracks: Can you actually install a traditional fireplace in a steel-and-wood building that was never really designed for one?
The short answer is yes. But the long answer—the one involving chimney engineering, structural loads, thermal dynamics, and building codes—is where things get fascinating. If you’re dreaming of a true, old-school fireplace (not a gas insert or a zero-clearance prefab unit), you need to understand how a barndominium’s unique construction changes the game. Let’s dig into the engineering realities, the hidden costs, and the design choices that make or break this kind of project.
What Makes a Barndominium Different From a Stick-Frame House
Before we talk fireplaces, we have to talk about the building itself. A barndominium isn’t just a house with a metal roof—it’s typically a post-frame structure. The primary load is carried by large, embedded posts (often 6×6 or larger) spaced every 8 to 12 feet, with horizontal girts (instead of studs) forming the walls. The roof is supported by trusses or rafters that are designed to span long distances without interior load-bearing walls.
This post-frame construction creates two major challenges for a traditional fireplace:
- Point loads matter. A traditional masonry fireplace and chimney can weigh anywhere from 5 to 15 tons. In a conventional wood-framed house, that weight is usually supported by a dedicated concrete footing and foundation wall. In a barndominium, the slab is often a monolithic floating slab—designed to support the post-frame structure but not necessarily a concentrated 10,000-pound chimney column.
- Thermal breaks and moisture control. Barndominium walls are typically insulated with closed-cell spray foam or rigid board between the girts. Penetrating that envelope with a massive masonry chimney creates a complex thermal bridge, and if it’s not detailed perfectly, you’re inviting condensation, rust, and air infiltration.
None of this makes a traditional fireplace impossible. It just means the approach has to shift from “let’s build a standard fireplace” to “let’s engineer this as an integral part of the structure.”
The Chimney Engineering That Nobody Talks About
If you’ve ever watched a mason build a fireplace on a job site, it looks deceptively simple: pour a footing, stack brick or stone, run a flue. But in a barndominium, the chimney engineering requires a level of forethought that most general contractors aren’t used to.
The Foundation: Not Just Another Slab Patch
The first conversation you’ll have—or should have—is with your structural engineer about the footing. A traditional masonry fireplace can’t sit on a standard 4-inch barndominium slab. The slab will crack, settle, and potentially compromise the chimney’s integrity. Instead, you’ll need an isolated footing that extends below the frost line (even in warmer climates, code usually requires a footer that goes down to undisturbed soil or engineered fill).
What does that look like in practice? It means before your slab is poured, you excavate a dedicated footer area—typically 12 to 18 inches deep and wide enough to extend at least 6 inches beyond the fireplace’s base. Reinforcing steel (rebar) ties this footer into the rest of the slab to prevent differential settlement, but it remains structurally independent enough to carry the heavy point load. In post-frame construction, this footer sometimes doubles as a reinforced pad for a nearby post, but that’s a decision that needs stamped engineering drawings.
The Chase: Where Masonry Meets Metal
Here’s where barndominium design gets creative. In a traditional home, the chimney runs up through framed walls and attic spaces, with required clearances maintained by framing members. In a barndominium, you’re dealing with wide-open spaces, steel girts, and often a roof made of metal panels over purlins.
You have two main options for the chimney chase:
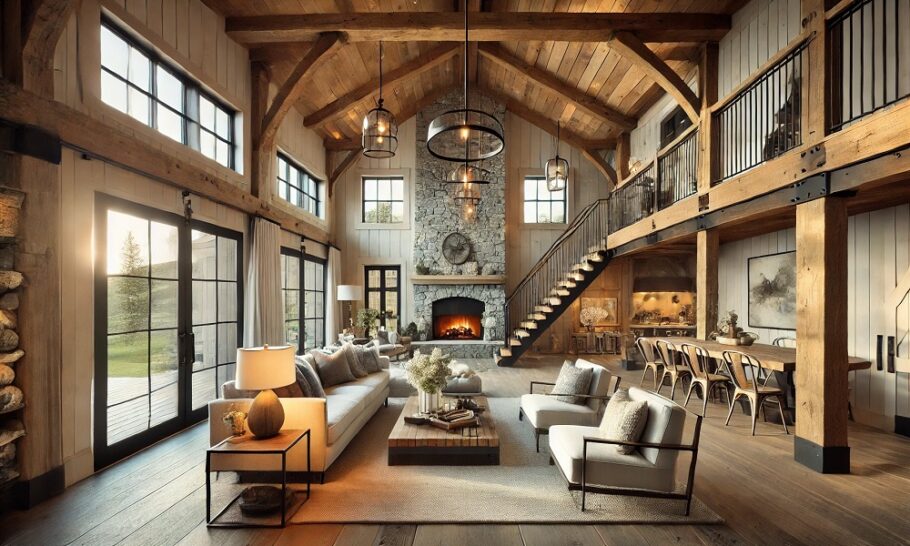
Option 1: Fully interior masonry chimney. This is the most visually striking—a massive stone or brick chimney that rises from the fireplace all the way through the ceiling and roof, exposed inside the living space. It’s also the most engineering-intensive. The chimney stack must be self-supporting or supported laterally by the building structure at specific intervals. Because barndominiums often have tall ceilings (18 to 24 feet is common), you’re essentially building a freestanding masonry column inside the steel frame. Engineers will typically design steel brackets or angles that connect the chimney to the building’s primary structure at the ceiling and roof levels to resist seismic and wind loads, without restricting thermal expansion.
Option 2: A chase that transitions to prefab at the ceiling. This is a more practical—and budget-friendly—approach. You build a traditional masonry fireplace and the first 8 to 10 feet of chimney as a decorative feature, then transition to an insulated Class A metal chimney above the ceiling line. That metal chimney runs through the attic space (if you have one) or through a framed chase to penetrate the roof. This approach reduces the weight load dramatically, simplifies clearances, and makes future maintenance easier because you’re not trying to sweep a 25-foot masonry flue from the top.
Clearances, Heat Transfer, and the Combustible Question
One of the biggest surprises for barndominium owners is how restrictive the clearances are between a masonry chimney and combustible materials. Even though your barndo might have steel girts and metal roofing, there are almost always wood elements: the roof purlins, the trusses, and often the interior finishes (if you’re using shiplap, OSB, or drywall over the girts).
International Residential Code (IRC) requires that masonry chimneys maintain a 2-inch air space between the exterior of the masonry and any combustible framing. That’s not just a suggestion—it’s a fire-safety mandate. In a typical home, this is achieved by framing a “chimney chase” with 2x4s or 2x6s set away from the masonry. In a barndominium, where the steel girts are often spaced 24 inches apart, you can’t simply notch a girt to wrap around the chimney. You have to reframe that section of the wall with appropriately spaced wood studs or, better yet, use non-combustible steel studs to maintain the clearance while preserving structural integrity.
Metal roofs add another layer of complexity. The roof penetration must be flashed with a storm collar and step flashing that’s compatible with both metal roofing and masonry. If you’re using a metal chimney above the ceiling, the roof jack is designed for that specific pipe. But if you’re bringing a full masonry chimney through a metal roof, you need a custom-built flashing system—usually a combination of copper or lead sheet that integrates with the corrugated metal profile. This is one area where cutting corners leads to chronic leaks, rust, and eventual structural damage to the roof decking.
The Venting Conundrum: Why Size Matters
Barndominiums often have open floor plans with lofts, mezzanines, or cathedral ceilings. That changes the draft dynamics of a traditional fireplace. A chimney’s ability to draft properly—to pull smoke up and out—depends on its height relative to the roof ridge and the pressure differences in the building.
In a tall, open space, you can get “negative pressure” issues where the chimney struggles to draw because the building itself acts like a giant stack. This is especially common in barndominiums with ridge vents or large exhaust fans. The solution often involves:
- Extending the flue height beyond code minimums (typically 3 feet above the roof penetration and 2 feet above anything within 10 feet horizontally)
- Ensuring the fireplace has a dedicated outside combustion air supply so it’s not competing with the building’s interior air pressure
- Specifying a flue liner diameter that matches the fireplace opening exactly (oversized flues in tall chimneys can actually perform worse because the exhaust gases cool too much before exiting)
A good hearth engineer will run the numbers—the flue size, the height, the local altitude, and the building’s envelope tightness—before the first brick is laid. In a barndominium, where the envelope is often exceptionally tight due to spray foam insulation, providing that outside air intake isn’t optional; it’s essential for both safety and performance.
Building Codes and the Rural Factor
Here’s a reality that many barndominium builders encounter: you’re often building in rural or unincorporated areas where local code enforcement can be… inconsistent. That doesn’t mean you can ignore the codes. If anything, it means you need to be even more meticulous.
The IRC has specific sections for masonry fireplaces (Chapter 10) that cover everything from the thickness of the hearth extension to the type of mortar. In a barndominium, the fact that your walls are non-standard doesn’t exempt you from these requirements. In fact, because barndos often fall into a “agricultural structure” loophole initially, lenders and insurers are increasingly requiring third-party inspections to verify that the fireplace installation meets national standards.
If you’re planning on using the fireplace as a primary heat source (or even as a supplemental one), your insurance company will likely require that it’s installed by a certified professional and inspected by a WETT-certified (Wood Energy Technology Transfer) or NFI-certified (National Fireplace Institute) technician. I’ve seen policies canceled post-construction because the owner DIY’d a masonry fireplace and couldn’t produce documentation of proper clearances and footing design.
Moisture, Condensation, and the Unseen Enemy
One topic that rarely comes up in traditional fireplace discussions but is critical in barndominiums is interstitial condensation. When you have a warm, humid interior space (especially if you’re in the South or any humid climate) and a cold masonry chimney that penetrates the roof, you can get condensation inside the chimney chase. In a wood-framed house, that might lead to mold. In a steel-framed barndominium, it leads to rust—specifically on the steel girts, fasteners, and any metal components in the chase.
To prevent this, the chimney chase—whether framed with steel or wood—needs to be ventilated at the top and bottom to allow any moisture to escape. This is often done with small grilles at the ceiling level and a vented chase cap at the roof. If you’re using a masonry chimney that’s exposed inside the living space, the risk is lower because the chimney is heated by the fire and the interior environment. But if the chimney is hidden in a chase, moisture control becomes a long-term durability issue.
Cost Considerations: Why the Price Tag Surprises People
If you’re coming from a traditional home building background, you might have a ballpark figure for a masonry fireplace: $10,000 to $20,000 for a basic brick or stone unit. In a barndominium, that number often climbs to $25,000 to $40,000 or more. The reasons are straightforward:
- Engineering fees. You’ll need a structural engineer to detail the footing, the lateral supports, and the roof penetration. That’s typically $1,500 to $3,000 just in stamped drawings.
- Masonry labor rates. Good masons are in high demand, and working in a barndominium—with its tall ceilings, steel interface details, and custom flashings—commands a premium. You’re not building a simple suburban hearth; you’re building a structural element that has to integrate with a post-frame building.
- Material transportation. If your barndo is in a remote location, expect added delivery fees for brick, stone, mortar, and flue liners. Masonry materials are heavy and require flatbed deliveries.
- Roofing integration. A custom metal roof penetration for a masonry chimney can add $1,500 to $3,000 in specialized labor and flashing materials, especially if the roofer and mason have to coordinate closely.
I’ve seen barndominium owners try to save money by using a prefabricated metal fireplace (like a wood-burning stove or a zero-clearance fireplace) instead of full masonry. Those are excellent alternatives that simplify engineering dramatically. But if you’re committed to the look, feel, and thermal mass of a true traditional fireplace, you have to be prepared for the investment—both upfront and in long-term maintenance.
When a Traditional Fireplace Makes Sense
After walking through all the engineering, clearances, and costs, you might be wondering if it’s even worth it. In my experience, it absolutely can be—when the conditions are right.
A traditional masonry fireplace shines in a barndominium that:
- Has a dedicated, well-planned location near an exterior wall (to simplify the footing and chimney path)
- Is being built from scratch, allowing the foundation and structural framing to be designed around the fireplace from day one
- Uses the fireplace as a true centerpiece—often with a large hearth for seating, a custom mantel, and stone that ties into other interior elements
- Is located in a climate where the thermal mass of masonry can help moderate temperature swings (common in the Midwest, Mountain West, and parts of the South)
Conversely, if you’re retrofitting a fireplace into an existing barndominium, the complexity increases exponentially. Cutting a slab to pour a new footing, opening up walls and roof for the chimney, and re-engineering lateral supports is a major undertaking. In those cases, a high-quality prefabricated fireplace with a realistic masonry surround is often the smarter path.
Working With the Right Team
If there’s one takeaway from this, it’s that installing a traditional fireplace in a barndominium is not a solo endeavor—or even a “general contractor plus a mason” endeavor. It requires a team that includes:
- A structural engineer experienced with post-frame buildings
- A mason who has done chimney work in metal buildings (not just residential tract homes)
- A roofer who specializes in metal roofing and complex flashings
- A mechanical/HVAC professional who understands combustion air and draft dynamics
I’ve seen projects go sideways because the homeowner assumed the framing crew could just “frame around” the chimney, only to find that the steel girts couldn’t be cut without compromising the building’s wind resistance. Or because the mason assumed a standard footing would work, only to have the slab crack months later.
When you assemble the right team early—preferably during the design phase—the process becomes surprisingly smooth. The engineer specifies the footing and lateral bracing; the mason builds the fireplace and flue to those specs; the roofer coordinates the penetration; and everyone walks away with a feature that adds real value, both aesthetically and functionally.
The Bottom Line
So, can you install a traditional fireplace in a barndominium? Yes—but it’s a project that demands respect for the engineering, the building science, and the craftsmanship involved. It’s not as simple as “frame it like a house,” because a barndominium isn’t built like a house. But when it’s done right, with proper planning, a robust footing, careful clearances, and meticulous integration with the metal shell, a traditional masonry fireplace becomes more than just a heat source. It becomes the gravitational center of the home—a place where the raw, industrial character of the barndominium meets the timeless comfort of fire.