The beauty of a barndominium lies in its blank canvas. Those wide open walls, soaring eaves, and metal siding offer something traditional stick-built homes simply cannot match: a clean slate for truly intentional lighting design. But here is where most barndominium owners stumble. They wait until the drywall goes up or the spray foam is in before thinking about where the lights and outlets will live outside. By then, it is too late. Every exterior fixture, every string of holiday lights, every security floodlight demands a rough-in before the insulation and interior finishes seal those metal studs and wooden posts away forever.
Getting the rough-ins right means thinking through three distinct layers of exterior lighting all at once. That includes the everyday ambiance that makes the place feel like home, the security infrastructure that keeps the property safe, and the seasonal flexibility for holiday displays. Miss any of these during the rough-in phase, and the solution becomes surface-mounted conduit snaking across beautiful exposed beams or, worse, battery-operated lights that die in a rainstorm.
The Unique Challenges of Barndominium Exterior Wiring
Barndominium construction throws a few curveballs that standard residential wiring simply does not face. The metal siding, for starters, plays havoc with traditional junction boxes and mounting methods. Standard exterior fixtures expect wood or masonry behind them. Instead, barndos typically have metal sheathing over purlins or directly over framing. This requires pancake boxes, special siding blocks, or surface-mounted boxes designed specifically for ribbed metal panels. Without planning these mounting points during the framing stage, an electrician ends up cutting awkward holes through the siding and praying the weather seal holds.
Then there is the insulation question. Most barndominiums use closed-cell spray foam directly against the metal siding. Once that foam goes in, fishing new wires through exterior walls becomes impossible. The foam locks everything in place like a rock. Every exterior outlet and switch box needs to be installed and wired before that foam truck shows up. The same goes for low-voltage landscape lighting transformers and the conduits that feed them.
Rough-In Strategy for Ambiance Lighting
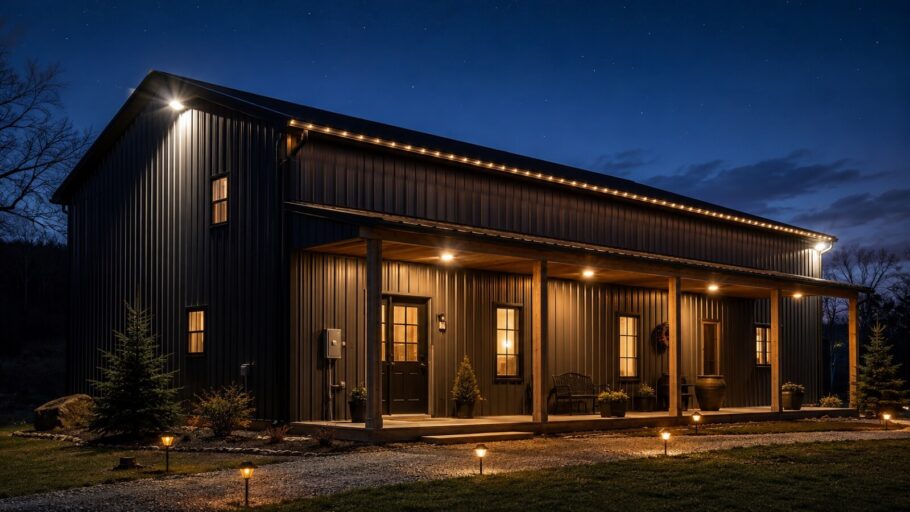
Ambiance lighting turns a metal building into a home. The goal here is layered lighting that makes the exterior feel warm and inviting without blinding anyone. Start with the entry points. Each door, whether it is the main 8-foot steel entry or a sliding barn door to the shop area, needs thoughtful illumination. Wall-mounted lanterns work well, but the mounting height matters tremendously. On a barndominium with 14-foot eave lines, a standard 66-inch mounting height disappears into the vertical expanse. Bump those up to 72 or 78 inches to keep the fixtures visible and proportional.
Downlighting from the eaves creates the most dramatic ambiance on a barndominium. This means installing weatherproof junction boxes upside down under the soffits or eave overhangs. Space these every 8 to 10 feet along the front porch and any other social areas outside. Use boxes rated for wet locations even under covered areas. Condensation drips, wind drives rain sideways, and metal roofs sweat. A standard box will corrode within two seasons.
Uplighting makes barndominiums look spectacular at night, especially those with timber frames or architectural details near the roofline. The rough-in for uplighting requires hardwired outlets or junction boxes low on the exterior walls, typically 12 to 18 inches above grade. These need to be positioned carefully to avoid lawn equipment damage and sprinkler heads. Install them with weatherproof-in-use covers so a plugged-in uplight fixture stays dry even when connected.
Path lighting between parking areas, the shop entrance, and the main living entrance needs switching from inside. Nothing frustrates like walking from the truck to the door in complete darkness. A three-way switch setup allows controlling the path lights from both the main entry and the mudroom. Run the low-voltage wire for path lights in conduit from the transformer location out to where the fixtures will go. Burying it later is possible, but running it before the landscaping goes in saves hours of trenching through fresh sod.
Security Lighting Rough-In Considerations
Security lighting serves a different purpose than ambiance. Ambiance welcomes; security warns. The rough-in locations for security lighting need to cover approaches, blind corners, and high-value targets like equipment bays or RV storage areas.
Motion-activated floodlights remain the gold standard for residential security. Each corner of the barndominium should have a junction box at eave height ready for a motion floodlight. Do not rely on a single light to cover two sides of the building. Metal siding blocks Wi-Fi and radio signals, and it also blocks light. A floodlight mounted on the south wall will not illuminate the north approach at all. Budget for eight to ten motion light locations on a medium-sized barndominium.
Switching matters here too. A motion light that stays on all night irritates neighbors and wastes electricity, but one that cannot be manually overridden becomes useless during a backyard gathering. Run 14-3 or 12-3 wire to each motion light location so a three-way or four-way switching setup allows manual override from inside. The electrician will thank you, and future barndominium owners will appreciate the flexibility.
Consider integrating dummy or always-on security lights near the main electrical panel and HVAC equipment. These mechanical areas often sit on the exterior of barndominiums rather than inside a basement or garage. Thieves look for these spots because they know shutting off power disables most security systems. A hardwired light on its own circuit, ideally before the main disconnect, keeps that area lit even if someone flips the main breaker.
Camera rough-ins go hand in hand with security lighting. Each exterior camera needs power, either through a nearby outlet or via Power over Ethernet (PoE) cabling. Run Cat6 or better to each camera location now, even if cameras are not installed immediately. Conduit from the camera locations back to the network equipment room makes future upgrades painless. Staple the cables to the framing and photograph everything before insulation.
Holiday Light Prep That Actually Works
Here is where barndominium planning pays off year after year. Holiday lights on a large metal building become a headache without dedicated outlets placed specifically for that purpose. No one wants to run nine extension cords across the roof or climb a 40-foot ladder every December.
The solution involves switched outlets under the eaves. Install standard duplex receptacles, weatherproof and with in-use covers, every 15 to 20 feet along the roofline. Connect these receptacles to a switch or two inside the house. Label those switches clearly. A single switch bank can control all the holiday outlets, turning the entire display on and off from the mudroom. No more crawling through snow to unplug a tangled mess of cords.
For barndominiums with a prominent roofline peak or gable end, install a single outlet at the very peak. This allows mounting a large star, wreath, or projection light without seeing the cord draped across the siding. The wire can run behind the metal siding if planned during construction, emerging through a small bushing exactly where needed.
Gutter and eave lines on barndominiums tend to be higher and straighter than traditional homes. This makes them perfect for permanent holiday light systems like trim lights or pixel LEDs. Rough-in low-voltage cable to the corners and peaks of the building if there is any interest in these systems. The cable costs very little during construction but saves thousands in installation later.
Do not forget outlets near the driveway entrance and mailbox. Many barndominiums sit on larger lots with the mailbox a few hundred feet from the house. A weatherproof outlet on a post or near the driveway allows plugging in inflatable decorations, light-up candy canes, or even a heated mailbox in cold climates. Run underground feeder cable to this location while the trenching equipment is already on site for the main electrical service.
Switching, Placement, and Code Requirements
Every exterior outlet in a barndominium needs GFCI protection. The most practical approach uses a single GFCI breaker or a GFCI outlet at the beginning of each circuit, protecting everything downstream. Do not put multiple GFCI devices on the same circuit unless absolutely necessary. They tend to trip each other in humid conditions, and metal buildings are always humid.
Switching locations matter more than most people realize. A bank of switches near each exterior door gives control over different lighting zones. Group the switches logically: porch ambiance on one, security floods on another, holiday outlets on a third. Use illuminated switches or add indicator lights so the family knows when the holiday lights are still burning power at two in the morning.
The National Electrical Code has specific rules for exterior outlets that apply to barndominiums the same as any dwelling. At least one outlet is required at the front and back of the building, no more than six and a half feet above grade. All exterior outlets need weatherproof covers rated for use while plugged in. And any outlet under eaves or on covered porches still requires wet-rated boxes because metal buildings do not shed water the same way wood-framed structures do.
Bringing It All Together Before Drywall
The window for getting this right is narrow. After the framing inspection and before the insulation contractor arrives, walk every exterior wall with the electrical rough-in complete. Bring a tape measure, a notepad, and the lighting plan. Verify each box location matches the intended fixture. Pancake boxes for wall sconces should be centered on the spaces between windows, not floating randomly. Eave outlets for holiday lights should align predictably, not tucked into odd corners.
Take photographs of every wall before insulation. These reference photos become invaluable five years later when someone wants to add a fixture and needs to know exactly where the wires run through the framing. Mark the distance from corners and windows in the photos or on a simple diagram stored with the home’s paperwork.
Consider running empty conduit from the attic or ceiling space down to the crawlspace or basement. This single piece of future-proofing costs almost nothing during rough-in but allows adding low-voltage landscape wire, fiber optic cable, or additional control wiring without cutting into finished surfaces. Leave a pull string inside each conduit for good measure.
The final piece involves labeling everything at the panel. Exterior lighting circuits should have clear, specific labels like “Front Porch Ambiance Lighting” or “South Eave Holiday Outlets.” Generic labels like “Outside Lights” help no one when a breaker trips during a Christmas party. Sharpie on the panel cover fades. Use a proper label maker or write directly on the breaker with an extra-fine permanent marker.
Barndominiums offer something special in how they blend industrial practicality with home comfort. The exterior lighting should do the same. With thoughtful rough-in planning before the insulation flies and the drywall goes up, those lights will work exactly as intended for decades. The holiday displays will plug in without drama. The security floods will illuminate every corner. And the warm glow of well-placed ambiance lighting will make that metal building feel like home every single night.