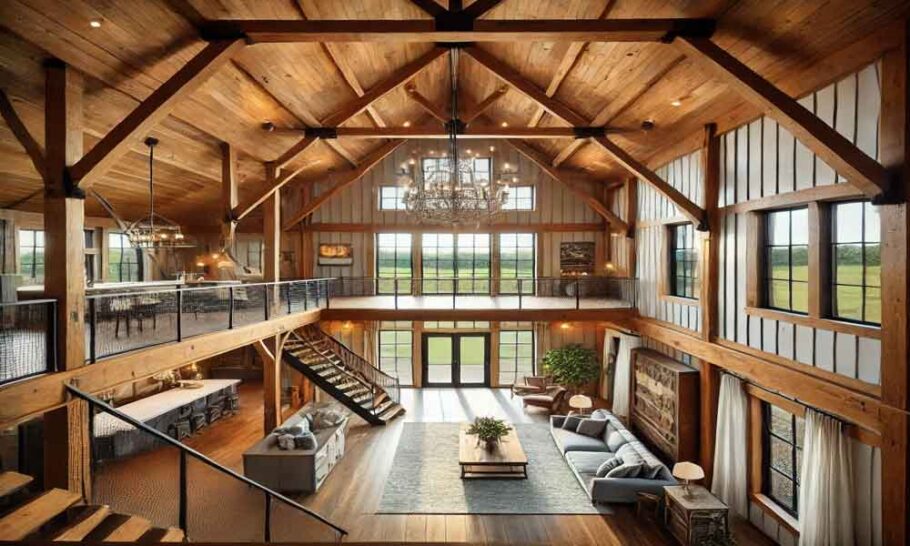
If you’ve spent any time scrolling through barndominium content online, you’ve seen the showstoppers: the floating treads, the reclaimed-wood monoliths, the spiral steel numbers that seem to defy gravity. They look simple. Effortless, even. But here’s what those glossy photos don’t show you—the quiet, nerdy, absolutely critical engineering that keeps those staircases from becoming expensive death traps.
I’ve consulted on about forty barndominium builds over the last six years, and without fail, the staircase becomes the most underestimated structural puzzle of the entire project. People think, “It’s just stairs. How hard can it be?” Then they realize their post-frame building has no interior load-bearing walls, the slab is only four inches thick in places, and that beautiful steel stringer they bought online is trying to rip itself off the wall. So let’s talk about what’s actually going on behind the drywall and the welds.
The Post-Frame Problem
Most barndominiums use post-frame construction—thick timber or laminated columns buried in the ground or set on concrete piers, with girts and purlins spanning between them. That’s fantastic for wide-open floor plans and high ceilings. It’s terrible for staircases. In a traditional stick-framed house, you’ve got stud walls every few feet. You can anchor a stair stringer into a king stud, tie it into the floor joists, and call it a day. In a barndo, your staircase is often floating in a vast, empty volume with nothing to grab onto.
I remember one build in east Texas where the homeowner wanted a straight run of stairs leading up to a mezzanine bedroom. Simple enough. But the nearest post was fourteen feet away. The slab was a standard 4-inch non-structural floor (just a cap over gravel, no rebar grid to speak of). The engineer on that job had to design a freestanding steel stair that carried all its load down to two isolated footing pads poured through the slab. We had to core holes, dig bell-bottom piers down to undisturbed clay, and set base plates. The homeowner thought we were being dramatic until he saw the deflection calculations. Without those footings, the whole staircase would have settled two inches within a year. That doesn’t sound like much until your riser heights start varying by a quarter inch—then you trip. Every. Single. Day.
The Stringer Secret No One Talks About
Let’s get specific about stringers. In residential construction, you’ll see cut-out wood stringers (where the treads sit in notches) or metal channel stringers. In barndominiums, steel rules. But the engineering hidden in that choice isn’t just about strength—it’s about buckling. A 10-foot steel C-channel stringer might handle a 300-pound point load at mid-span just fine in a lab. But in the real world, with people bouncing up and down, with thermal expansion in a metal building that swings from 30°F to 110°F between seasons, that same stringer can twist.
I’ve seen it happen. A builder in Missouri used 4-inch steel channel for a set of open-riser stairs. No lateral bracing between the two stringers, just bolted the treads directly to the channel flanges. Within six months, the stringers had developed a noticeable sway. When a 200-pound guy walked up, the whole staircase would torque maybe an inch to the right. It felt like walking on a diving board. The fix? We had to weld in diagonal cross-bracing under the treads (hidden, but effective) and add a continuous angle iron along the backside of each stringer to stiffen the compression flange. That’s the kind of detail you never see in a Pinterest photo.
Proper engineering here means running a buckling analysis. For a typical barndo staircase with a 12-foot rise, your stringer unbraced length might be the entire span if you don’t have intermediate landings or wall attachments. The International Residential Code (IRC) doesn’t really cover this scenario well because it assumes wood framing. So you’re into the International Building Code (IBC) and AISC steel manual territory. Most residential contractors don’t own those books. They should.
The Slab Connection Headache
Here’s where things get really hidden. That beautiful staircase has to connect to the floor below and the structure above. The bottom connection is usually the bigger problem because barndominium slabs are notoriously unpredictable. Post-frame buildings often have slab-on-grade that was poured after the columns went up, meaning the slab isn’t structural. It’s just a wear surface. You cannot anchor a stair stringer with a couple of Tapcon screws and expect it to hold.
The right way is what we call a “thickened edge” or a separate footing. If you’re planning ahead (and nobody ever does), you tell your concrete crew to pour a 12-inch-deep by 12-inch-wide continuous beam right where the staircase will land. Then you set embedded anchor bolts or a steel base plate. If you’re retrofitting—and most barndo owners are, because they decide on the staircase after the slab is already cured—you’re looking at epoxy anchors with serious embedment depth. We’re talking 6 to 8 inches of solid concrete. If your slab is only 4 inches thick, you can’t get that depth without coring through. So now you’re drilling into the base material below the slab (often gravel or dirt), which means your anchor has zero lateral resistance. That’s a non-starter.
One workaround I’ve used successfully is a “spreader base”—a wide steel plate, maybe 12×12 inches, that distributes the stair’s load across a larger slab area. You epoxy four 1/2-inch anchors into the slab, torque them to spec, and then set the stringer onto that plate with a hinge connection. It’s not as good as a footing, but it works for lighter staircases. For heavy staircases—say, with concrete-filled treads or thick oak—you really need those footings. Don’t let anyone tell you otherwise.
Landings and the Mezzanine Trap
Many barndominiums have mezzanines or lofts accessed by the stairs. That landing at the top isn’t just a platform; it’s a critical structural interface. The staircase is trying to push outward at the top (horizontal thrust, like an A-frame ladder), and if that landing isn’t tied into something rigid, the whole thing spreads apart.
I’ve seen a landing tear itself off a mezzanine edge because the builder just bolted the stair stringers to the mezzanine’s rim joist without any diagonal bracing. The mezzanine itself was designed for vertical load only—bedroom furniture, people sleeping—not for a horizontal kick of several hundred pounds every time someone takes a step. Within a year, the rim joist had deflected outward almost an inch. The stair treads were no longer level; they sloped noticeably to one side.
The engineering fix is either to add a horizontal tension member (a steel rod or cable that runs from the top of one stringer to the other, under the treads) or to brace the landing back to the main building frame. In post-frame construction, that often means running a heavy angle iron from the mezzanine rim joist to the nearest timber column. It’s ugly, but you can hide it behind drywall or a built-in bookshelf. The point is, that load path has to be designed before the mezzanine gets framed.
Handrails: The Code Nightmare
Handrails seem simple. They’re not. The IRC requires a handrail on at least one side of any staircase with four or more risers. It must withstand 200 pounds of concentrated load in any direction. In a barndominium with metal posts and open treads, attaching a handrail that meets that load without wobbling is a genuine engineering challenge.
Most residential handrails rely on the wall behind them. You’ve got studs, you screw into them, done. In a barndo, your stair might be completely freestanding. So the handrail has to be either structural steel (like a heavy pipe rail welded directly to the stringer) or you need a secondary post system. I’ve seen too many builders try to use flimsy wrought-iron balcony balusters from a big-box store. Those are rated for vertical load, not lateral. A 200-pound sideways pull—someone stumbling, a kid swinging on the rail—will snap the welds or bend the posts.
The hidden engineering here is in the base connection of each handrail post. If you’re welding to a steel stringer, you need a full-penetration weld with a gusset plate, not just a few tack welds. If you’re bolting to a wood tread, you need a 1/4-inch steel plate under the tread to spread the load, plus carriage bolts with lock washers. And that plate has to be sized so the tread doesn’t split. We’ve switched to using LVL (laminated veneer lumber) treads for this reason—they have far better fastener holding than solid oak or pine.
Thermal Movement and Noise
This one surprises people. A barndominium’s metal shell expands and contracts significantly with temperature changes. The interior staircase, if it’s made of wood, doesn’t move at the same rate. So where the stairs attach to the building’s structure, you get stress concentrations. I’ve seen wood stringers pull their top lag bolts right out of a steel beam flange because the beam shrank 3/8 inch in winter while the wood stayed put.
The solution is slotted connections. At the top of the staircase, instead of drilling round holes for your bolts, you use horizontal slots about an inch long. That allows the building to move without dragging the stairs along with it. You still need a positive connection for seismic and wind loads—so you use a heavy washer that can slide but not pull through. It’s a detail you’ll never see in a finished barndo, but it’s the difference between a staircase that stays quiet and level for decades and one that develops mysterious creaks and pops every spring and fall.
And speaking of noise: open-riser steel stairs in barndominiums are acoustic nightmares. The hollow steel stringers act like soundboards. Every footstep rings. The hidden fix is the damping compound—the same stuff used in car audio. You can buy sheets of butyl rubber with aluminum facing, cut them to size, and stick them to the inside faces of the steel stringers before you close things up. Then you fill any remaining cavities with spray foam. The difference is shocking. A staircase that would have sounded like a church bell instead sounds like a solid, quiet thud.
The Takeaway for Barndo Owners
Here’s what I tell every client: budget for engineering on your staircase. Not just the treads and railings you can see, but the connections, the footings, the lateral bracing, the thermal slots, the damping. A good barndominium staircase isn’t expensive because of the materials. It’s expensive because of the thinking that goes into making it safe, stable, and silent.
And please, for the love of all that is holy, don’t let your general contractor “figure it out.” I’ve walked into too many barndos where the stairs felt like a carnival ride. The engineering is hidden, but the consequences of skipping it are not. You’ll notice a wobbly handrail every single day. You’ll hear the creak and pop of a connection that’s fighting the building’s movement. And if something fails, it won’t be a slow, gentle sag—it’ll be a sudden drop.
Stairs are the most used, most abused structural element in any home. In a barndominium, with its open plans and non-traditional framing, they demand respect. So next time you see a photo of a gorgeous floating staircase in a barn conversion, take a second to appreciate what you’re not seeing. The hidden engineering is the real hero. And it’s a lot harder to make it look easy than you think.